

A vacuum that once collected dust and crumbs now needs repeated passes, leaves hair on the rug or pushes dirt across the tiles. A vacuum cleaner losing suction can be a simple maintenance issue, but poor pickup doesn’t automatically mean the motor is failing.
A full bin, blocked filter or clogged hose can restrict airflow. A tangled brush, unsuitable floor-head setting, leaking seal, cordless power issue or internal fault can produce similar results.
Start safely: switch off and unplug the vacuum before inspecting it. For cordless models, follow the manual’s power-isolation instructions, including removing a user-removable battery where required. Let hot components cool.
Stop-use safety box
Stop using the vacuum if there is smoke, a burning smell, sparking, visible electrical damage, abnormal heat, repeated breaker trips or water inside electrical components. Disconnect power if safe and contact authorised service. Do not open the motor housing, modify wiring or bypass protective devices.
Why Is My Vacuum Cleaner Losing Suction? Quick Answer
Possible causes include a full dust container, clogged filters, a blocked air path, a tangled brush, incorrect floor-head settings, loose components, overheating, cordless power problems, incorrect wet-and-dry configuration or an internal fault.
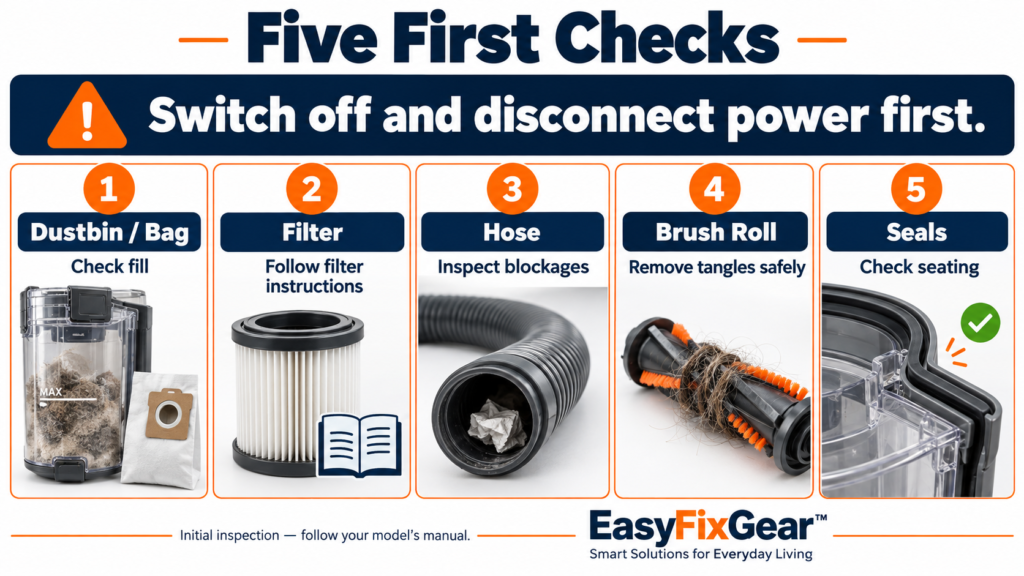
Follow this first-check sequence:
- Stop and disconnect power.
- Check the bin or bag and its inlet.
- Inspect filters according to the manual.
- Check the hose, wand and floor head for blockages.
- Check the brush roll, where fitted.
- Reassemble completely and test safely.
If airflow seems normal but the vacuum cleaner is not picking up dirt, focus on the head, brush and surface settings. Weak airflow at a manufacturer-approved hose test point suggests a problem elsewhere in the air path. Philips’ official troubleshooting guidance identifies collection-container, filter, hose, nozzle and setting problems as distinct possibilities. Philips troubleshooting.
Diagnose the Problem Before You Start Cleaning
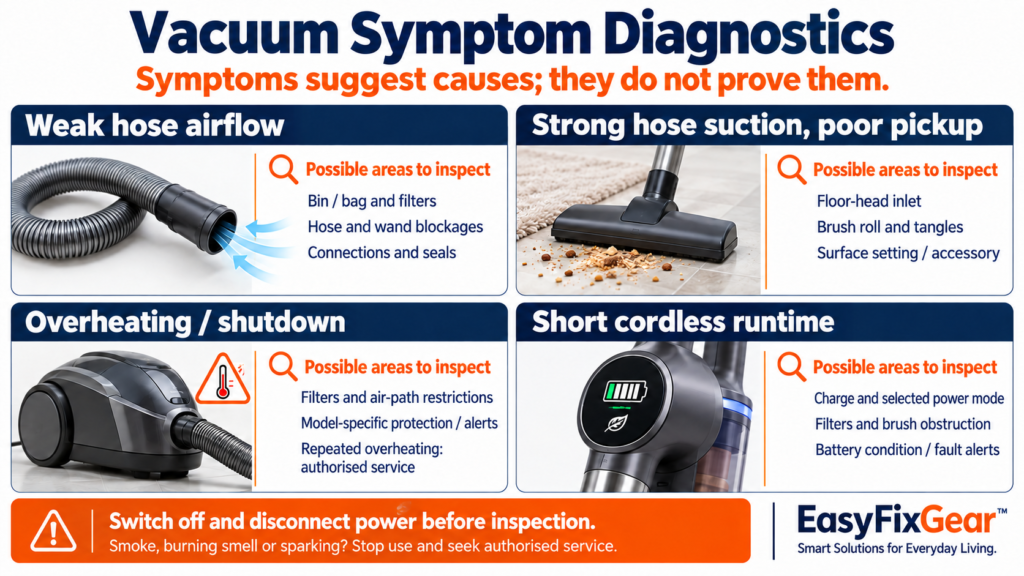
These symptoms suggest possible causes; they do not prove a diagnosis. All inspection checks below require power to be disconnected. Any powered comparison must follow the manual, with required filters and protective components installed.
| Symptom | Possible Cause | First Safe Check | When to Seek Service |
|---|---|---|---|
| Weak airflow at hose opening | Bag, filter or hose restriction; leak | Inspect container, filters and hose | Weakness remains after maintenance |
| Strong hose suction but poor floor pickup | Head blockage, brush fault, wrong setting | Inspect head inlet and brush | Head remains ineffective, or brush fails |
| Sudden loss of suction | Lodged object, loose connection, protective shutdown | Inspect accessible joints and air path | No accessible cause; fault returns |
| Gradually declining performance | Loaded filter, accumulating debris, brush wear | Check filters and brush condition | Correct maintenance does not help |
| Unusual high-pitched sound | Restriction, leak or internal problem | Inspect accessible air path | Persistent or accompanied by heat |
| Overheating or automatic shutdown | Restriction, thermal protection, internal fault | Allow cooling; inspect filters and clogs | Repeated shutdown or abnormal heat |
| Poor pickup only on carpets | Insufficient agitation, unsuitable height or mode | Check carpet setting and brush | Brush mechanism remains faulty |
| Poor pickup only on hard floors | Wrong attachment, obstructed inlet, scattered debris | Check approved hard-floor head | Damage or persistent head fault |
| Cordless vacuum runs weakly or briefly | Mode, charge, ageing battery, restriction | Check display, mode and charging instructions | Fault alerts or abnormal battery behaviour |
| Robot leaves debris | Bin/filter, rollers, side brush, inlet or mode | Inspect cleaning assembly and alerts | Persistent pickup or brush error |
| Wet-and-dry vacuum loses suction after liquid pickup | Full tank/float closure, setup or filter issue | Switch off; check tank and manual | Fault persists, or electrical parts became wet |
What “suction” actually means
Suction pressure is the pressure difference the vacuum creates. Airflow is the moving air that transports debris. An air-path restriction limits that movement. Brush agitation loosens dirt, especially from carpet. Effective pickup depends on these working together with the cleaning head.
A motor can sound normal while too little air reaches the floor. Conversely, strong pull at the hose does not prove that the brush or nozzle is cleaning properly.
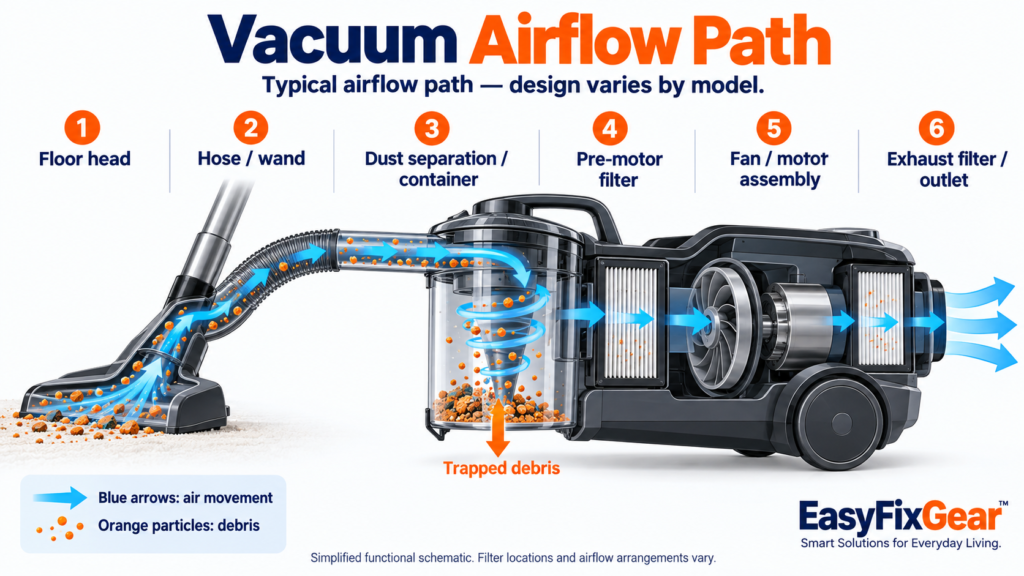
Motor input wattage describes electrical consumption, not a guarantee of cleaning performance. Manufacturers such as Nilfisk list rated power, airflow and vacuum pressure separately. For the practical differences, see Vacuum Cleaner Suction Power Explained: Watts, Pa, Air Watts & What Really Matters. Nilfisk technical specifications.
10 Causes of Vacuum Suction and Pickup Problems
1. Full Dust Bin or Vacuum Bag
A loaded bag can restrict airflow through its material. An overfilled bagless container can obstruct its inlet or interfere with separation. Symptoms include declining pickup and a fill warning.
Check and fix: disconnect power, inspect the fill mark and inlet, then empty the bin or replace the bag with the correct type. Follow the specified procedure for reusable bags; do not empty and reuse a disposable bag.
An apparently half-full container may still have hair bridging its opening. Fine dust can load a bag before it looks full, so volume alone is not decisive.
Avoid: packing debris down or ignoring a persistent indicator. Seek service if the warning remains after the bag, filters and air path are checked. Philips bag and container guidance, Kärcher KWD 2 S/WD 3 S manual.
2. Dirty or Blocked Filters
Filters capture particles but can restrict airflow when loaded. A pre-motor filter protects the motor; a post-motor or exhaust filter filters outgoing air. HEPA describes filtration performance, not washability.
Symptoms include gradually weaker airflow or a filter alert.
Check and fix: identify each filter in the model manual. Use only its approved cleaning method, or replace it when required. Replace torn or deformed filters with the specified part.
The Dyson V15 Detect filter is washable and requires at least 24 hours’ drying and complete dryness before refitting. Philips’ cited troubleshooting page distinguishes a washable motor-protection filter from a non-washable exhaust filter. Those instructions are not interchangeable.
Avoid: washing an unidentified filter or testing without required filtration. Seek support if a correctly fitted, clean or replacement filter does not resolve the problem. Dyson V15 filter care, Philips filter guidance.
Before attempting maintenance, use our guide to cleaning vacuum filters safely to identify whether your exact filter permits washing, approved dry care or replacement.
3. Blocked Hose, Wand or Air Path
Paper, fabric, leaves and hair can lodge at bends or narrow connections. A partial vacuum cleaner clogged hose may cause weak pickup; a complete obstruction can cause sudden loss or a model-specific warning.
Check and fix: disconnect power and remove only user-detachable sections. Look through a straight wand against a light and inspect accessible hose ends. Gently remove reachable debris using the manual’s method.
Avoid: wire hangers, screwdrivers, sharp tools or forcing a rod through a flexible hose. These can puncture it or push debris deeper.
An inaccessible obstruction or a blockage alert that returns needs support. Dyson Digital Slim documentation, for example, describes pulsing during blockage detection; pulsing is not a universal error code. Dyson Digital Slim manual.
4. Tangled or Obstructed Brush Roll
Hair, thread and carpet fibres can wrap around the roller or its ends. The brush may stop, turn poorly or lose contact with the surface while hose suction remains normal.
Check and fix: isolate power, inspect the brush and remove loose tangles gently. Remove the roller only if the manual provides a user-maintenance procedure. Use cutting tools solely where the manufacturer specifies a safe method.
Avoid: inserting fingers into a powered head, cutting bristles or opening a head motor. Some rollers are washable; complete powered heads may not be.
If the vacuum cleaner brush roll is not spinning after approved cleaning and reassembly, seek service. Dyson brush-bar troubleshooting.
5. Blocked or Incorrectly Configured Floor Head
The nozzle opening can clog independently of the hose. The wrong surface setting, inappropriate accessory or unsuitable brush height can also reduce pickup.
Typical clues are good above-floor cleaning but poor floor cleaning, or performance that changes between tiles and carpet.
Check and fix: inspect the disconnected head’s inlet and neck. Select the approved carpet or hard-floor setting and adjust height where available. Not every machine has these controls: SEBO’s 300/350 Mechanical uprights, for example, have manual brush-height adjustment.
Avoid: assuming the lowest setting is best or modifying nozzle openings. Seek service for damaged wheels, adjustment mechanisms or head components.
6. Air Leaks, Damaged Seals or Poorly Fitted Components
Unwanted air entering through a cracked hose or poorly seated component can reduce the useful airflow drawn through the cleaning head. Performance that worsens immediately after emptying or filter maintenance suggests checking assembly first.
Check and fix: inspect hose joints, bin lid, accessible seals and filter seating. Refit parts as shown in the manual and remove debris from sealing surfaces using an approved method.
Avoid: forcing clips shut, applying glue to seals or treating tape as a permanent hose repair. Replace damaged user-replaceable parts with approved components.
Broken latches, internal leaks or persistent failure to seal require service. Philips specifically identifies incorrect container-lid placement as a possible performance problem. Philips container guidance.
7. Overheating or Thermal Protection
Restricted airflow can contribute to overheating in some designs. Protective systems may stop the vacuum, but a shutdown alone does not identify its cause.
Check and fix: switch off, disconnect power and follow the model’s cooling instructions. Inspect accessible filters, collection container and blockages before any restart.
SEBO documents airflow protection on its DART, while Dyson describes overheating protection in its troubleshooting guidance. Cooling and reset procedures vary.
Avoid: repeatedly restarting, covering vents or bypassing thermal protection. Repeated overheating, unusually hot components or recurring shutdowns need authorised inspection. Dyson overheating troubleshooting.
8. Battery or Power-Mode Problems in Cordless Vacuums
Cordless vacuum weak suction can reflect a lower-power mode, an airflow restriction or a fault. Reduced runtime can instead reflect incomplete charge, intensive mode or battery ageing.
Check and fix: note the charge indicator, selected mode and error message. Charge using the approved charger and compare performance in the same mode with the same attachment.
Low charge does not make every cordless vacuum gradually weaker; some maintain output and then stop. Dyson explains that high-power modes shorten runtime and batteries degrade over time.
Avoid: opening lithium-ion packs or using improvised chargers. Seek support for persistent faults, unexpected shutdown or battery damage; replace batteries only through the approved procedure. Dyson battery care.
9. Wet-and-Dry Vacuum Configuration Problems
This cause applies only to models authorised for liquid pickup. Tank fullness, float closure and incorrect wet/dry filtration can interrupt airflow.
Check and fix: switch off and unplug. Check tank contents, accessible float components and the exact wet-pickup setup in the manual. Empty and maintain the tank as instructed.
For the cited Kärcher KWD 2 S/WD 3 S manual, wet pickup requires removing the filter bag; dry filtration requirements differ by supplied filter. That is not permission to remove every filter.
Avoid: copying another model’s conversion procedure or using a dry-only vacuum for spills. Seek service if suction remains absent after correct setup, or water reached electrical components. Kärcher model manual.
10. Motor, Fan or Internal Component Problems
Persistent weak airflow after correct maintenance can indicate an internal fault. Damaged fan components, motor problems or controls require professional diagnosis; noise and poor suction alone cannot establish motor failure.
Check and fix: record the model number, alerts, symptoms and maintenance completed. Arrange authorised inspection if the air path is clear and assembly is correct.
Avoid: opening the motor housing, testing exposed electrical parts or modifying wiring. Ask for a diagnosis and quotation before approving parts replacement.
Smoke, sparking, burning smell or electrical damage requires immediate stop-use action. Bosch India vacuum support, Bosch safety manual.
Why Suction Problems Differ by Vacuum Type
| Vacuum type | Troubleshooting difference |
|---|---|
| Bagged canister | Bag material can become restrictive before the bag appears full; check correct seating |
| Bagless canister | Inspect bin inlet, accessible separator and lid seals; emptying alone may not clear restrictions |
| Upright/stick | The brush, head airway and surface controls can explain poor pickup despite normal hose suction |
| Cordless | Separate airflow problems from mode, charge and runtime problems |
| Robot | Check the compact inlet, rollers, side brush and alerts; missed areas can be navigation issues |
| Wet-and-dry | Confirm wet/dry setup, tank condition and model-specific overflow protection |
Robot Vacuum Not Picking Up Dirt? Check These Additional Issues
With the robot switched off as its manual requires, inspect the dustbin, filter, main brush ends, suction inlet and side brush. A worn or obstructed side brush can leave edge debris even when the vacuum inlet works.
Check the selected cleaning mode and maintenance alerts. Verify that the debris and carpet are suitable for the model.
ECOVACS documents main-brush entanglement checks, but removal procedures vary. iRobot’s Plus 400 guidance says not to wash its filter; other Roomba models have different requirements. ECOVACS brush maintenance, iRobot Plus 400 filter care.
If the robot never reaches the dirty area, investigate navigation or access first. Robot Vacuum vs Regular Vacuum explains their different cleaning roles.
Cordless Vacuum Losing Suction or Runtime
Compare like with like: the same attachment, surface and power mode.
- Normal pickup but shorter sessions: check charge, mode and battery condition.
- Poor pickup from the beginning: inspect filters, inlet and brush.
- Pulsing or shutdown: follow the displayed fault and model troubleshooting procedure.
Check overheating and brush obstruction before assuming the battery needs replacing. Higher-power modes trade runtime for output; the relationship depends on the model. Dyson power-mode guidance.
Why a Wet-and-Dry Vacuum May Suddenly Lose Suction
On documented float-equipped designs, rising liquid closes the suction opening. The motor may continue running with a changed pitch rather than switch off. Stop immediately; do not keep trying to collect liquid.
Unplug, empty the tank and follow the float, filter and drying instructions before returning to dry pickup. Other machines use different overflow protection. Kärcher wet-and-dry guidance.
For appliance suitability, see Wet & Dry Vacuum Cleaner: Is It Worth Buying?.
How to Find a Vacuum Blockage Without Damaging the Machine
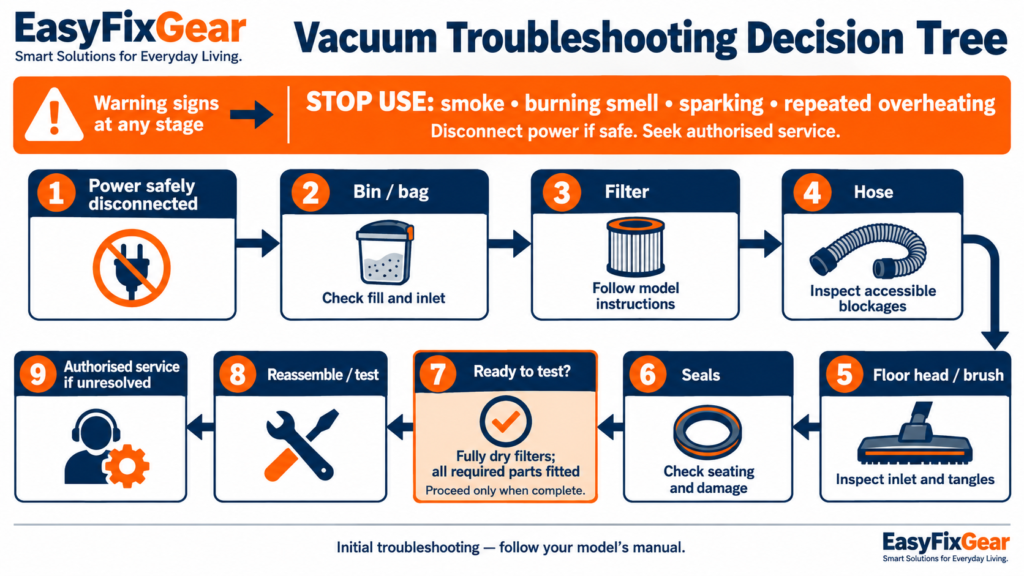
Work through accessible components with power disconnected:
- Container: inspect the bag opening or bin inlet.
- Filters: check loading and seating; identify the permitted care method.
- Hose and wand: detach approved sections and inspect both ends.
- Floor head: inspect the inlet, neck and brush chamber.
- Connections: check joints and seals before reassembly.
For robots, use the compact brush-to-bin path. For wet-and-dry machines, check the tank and overflow mechanism first when loss follows liquid pickup.
Use visual and manual checks because running dismantled equipment can expose moving parts or remove protection. Do not operate without required filters merely to test suction unless the manufacturer explicitly authorises it. Philips safety instructions.
My Vacuum Has Suction but Still Won’t Pick Up Dirt
A floor head must admit debris and maintain suitable contact with the surface. Carpet dirt may need agitation; large crumbs may not fit beneath a low nozzle.
| Suction appears normal | Airflow appears genuinely weak |
|---|---|
| Inspect brush agitation and wear | Inspect bag/bin and filters |
| Check surface setting and head height | Inspect hose, wand and accessible airways |
| Check head inlet and debris clearance | Check seals and connections |
| Use an approved accessory for the task | Seek service if maintenance does not help |
On tiled floors, a head can push larger crumbs ahead. On rugs, a stationary brush may leave embedded hair. Neither observation proves a weak motor.
For the relationship between pressure, airflow and cleaning, use the suction-power explainer, supported by Dyson’s explanation of pressure and airflow.
How to Restore Vacuum Performance Safely
- Disconnect power and consult the model manual.
- Empty the container or replace the correct bag.
- Clean or replace filters using their specified method.
- Inspect approved detachable hose and wand sections.
- Clear the floor head and maintain the brush.
- Check seals, latches and component seating.
- Reassemble with every required filter and cover installed.
- Test on a suitable surface, following the manual.
Drying is part of the maintenance, not an optional delay. A washed filter must meet the specified drying instructions and be fully dry internally before installation. Do not improvise heat-drying methods. BLACK+DECKER filter-care guidance.
How Often Should You Clean Vacuum Filters and Brushes?
Use the manufacturer’s schedule and maintenance alerts as the starting point. Adjust inspections for cleaning frequency, pets, flooring and the amount of dust collected.
Seasonal dust entering an Indian apartment, pet hair on rugs or dirt tracked in during monsoon weather can justify closer attention. Never assume a universal weekly or monthly interval.
Fine renovation dust may rapidly load filtration. Hazardous construction dust, asbestos, toxic dust and unknown hazardous material require appropriate specialised equipment—not an ordinary household vacuum. Dyson fine-dust maintenance guidance, Bosch material restrictions.
When Should You Repair or Replace a Vacuum Cleaner?
Temporary suction loss is not a reason to replace an otherwise suitable appliance.
| Situation | Practical decision |
|---|---|
| Full bag, loaded filter or accessible clog | Complete approved maintenance first |
| Damaged user-replaceable hose or head | Price the genuine part |
| Appliance under warranty | Contact authorised support before repairs |
| Reduced cordless runtime | Compare approved battery cost with overall condition |
| Repeated overheating | Obtain a diagnosis before further use |
| Confirmed internal fault | Compare written quotation, warranty and expected usefulness |
| Parts unavailable or several components worn | Consider replacement |
| Appliance unsuitable for your surfaces or tasks | Assess whether a different type solves the actual problem |
Age matters alongside condition, parts availability and repair cost. No universal age or repair-cost percentage settles the decision.
If replacement is justified, Best Vacuum Cleaners for Indian Homes can help assess suitability. For complementary cleaning tasks, Best Cleaning Gadgets That Actually Make Housework Easier offers broader options.
Warning Signs That Need Professional Service
Stop troubleshooting for smoke, burning smell, sparking, damaged electrical components, abnormal heat, repeated breaker trips or water ingress into electrical parts.
A swollen, leaking or damaged cordless battery also needs manufacturer advice. Do not open it.
Never vacuum hot ash, flammable liquids, asbestos, toxic dust or unknown hazardous material with an ordinary household vacuum. Wet-and-dry capability does not make a machine suitable for every liquid or dust. Bosch safety instructions, Kärcher ash restrictions.
Mistakes That Can Make Vacuum Suction Problems Worse
- Washing non-washable filters.
- Reinstalling filters while damp.
- Running without required filters.
- Ignoring clogs or overfilling bins.
- Forcing objects through hoses.
- Cutting brush components incorrectly.
- Using the wrong wet/dry setup.
- Repeatedly restarting an overheating vacuum.
- Buying a replacement before checking maintenance.
Five-Minute Vacuum Suction Checklist
An initial inspection—not a promise that every repair takes five minutes.
- Power disconnected; hot components cooled.
- No stop-use warning signs.
- Bag/bin and inlet checked.
- Filter type and condition checked against manual.
- Hose/wand inspected for accessible debris and damage.
- Floor-head inlet and brush inspected.
- Seals, joints and latches seated correctly.
- Required components refitted; washed filters fully dry.
- Safe test completed, or service arranged.
Vacuum Cleaner Losing Suction? Start With the Air Path
For a vacuum cleaner losing suction, begin with the container, filters and accessible air path. If hose performance seems normal, investigate brush agitation, floor-head settings and suitable accessories.
Cordless power behaviour and wet-and-dry overflow protection need separate checks. Maintain or repair the appliance when appropriate, but leave unresolved internal faults and electrical warning signs to authorised service.
Frequently Asked Questions
Why is my vacuum cleaner losing suction?
Possible causes include a full bag/bin, blocked filters, clogged airways, leaks or an internal fault. Poor floor pickup can also come from the brush or head setting.
Why does my vacuum have suction at the hose but not at the floor head?
Inspect the head inlet, connecting neck, brush and surface setting. Normal hose performance points towards the head, but does not prove a specific fault.
Can a dirty HEPA filter reduce suction?
Yes, a loaded filter can restrict airflow. HEPA does not mean washable; follow the exact filter’s cleaning or replacement instructions.
Why does my vacuum suddenly stop working?
Possible explanations include protective shutdown, depleted battery, blockage or an electrical fault. Disconnect power and follow model troubleshooting; repeated shutdown needs service.
Why is my cordless vacuum losing suction?
Check mode, charge, filters, inlet and brush. Shorter runtime alone is different from weaker cleaning while the machine operates.
Can I wash my vacuum filter?
Only if the manufacturer says it’s washable. Follow the approved method and drying requirements; otherwise, use specified dry care or replacement.
Why is my robot vacuum not picking up dirt?
Check the bin, filter, suction inlet, main brush, side brush and cleaning mode. A robot that misses the area may have a navigation problem.
Why does my wet-and-dry vacuum lose suction?
A full tank can activate overflow protection. Incorrect configuration or a filter restriction is another possibility; consult the model’s wet/dry instructions.
Can a damaged hose cause suction loss?
Yes. A crack or poor connection can admit unwanted air and reduce effective pickup. Replace damaged components using approved parts.
When should I replace a vacuum instead of repairing it?
Consider replacement when suitable parts are unavailable, multiple components are worn, or a confirmed repair is poor value compared with a suitable replacement.
How We Researched
This guide synthesises manufacturer manuals, official troubleshooting documentation and established appliance-maintenance principles. Sources cover canister, upright, cordless, robot and wet-and-dry designs. EasyFixGear did not physically inspect, measure or repair appliances for this article. Your model’s manual takes precedence over general guidance.
Research Sources
Canister and safety: Philips India low-suction troubleshooting, Philips safety and maintenance instructions, Bosch vacuum manual.
Upright and cordless: Dyson brush troubleshooting, Dyson V15 care, Dyson battery care, SEBO documentation.
Robot: ECOVACS main-brush maintenance, iRobot Plus 400 bin/filter care.
Wet-and-dry: Kärcher KWD 2 S/WD 3 S manual, Kärcher wet-and-dry guidance.
Technical principles: Nilfisk specifications, Dyson pressure/airflow explanation.
Last updated: 1 October 2026